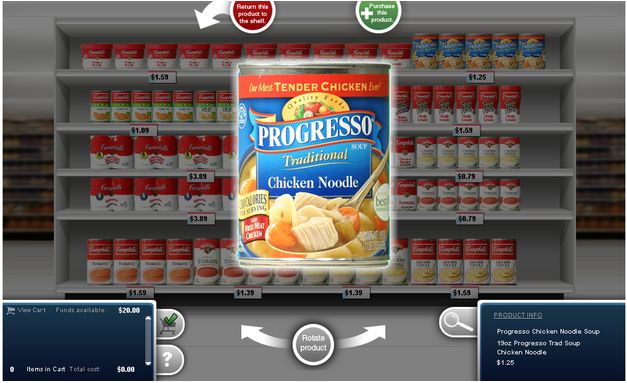
A Virtual Shopping Exercise displays a set of products on the screen, usually organized on a virtual shelf, for the respondent to choose from. The number and combination of products shown is determined by a planogram design. This design can be static or can control factors such as availability, shelf location, price, sale price, product label, etc. We have the ability to incorporate features such as allowing the respondent to rotate the product and examine the details of the packaging using a magnifier to name a few.
The following image is an example of a virtual shopping exercise:
We will need the following information/materials to program a virtual shopping exercise:
Documentation:
- Instructions:
- A mock-up or layout of shelf (not necessary, but very helpful).
- Information that needs to be displayed on the shelf (i.e. name, price, notes, etc.)
- Do we need to calculate prices?
- Are there sale prices?
- Is there a particular way the products should be grouped and/or randomized?
- Should we display the product size?
- Is a magnifier needed?
- What should we use as a background (i.e. blank background, store shelf, checkout counter, cooler, etc.)?
- Will there be multiple shelves (i.e. cold section vs. warm section, front of store vs. back of store, different isles, etc.)?
- Are there any other significant requests?
- Planogram (highly recommended)
- This contains the layout of the exercise.
- These usually have both a graphical and informational element to them. The graphical element is the items as they would be arranged and the informational element would consist of the names of the items and how they correspond to the design file and/or master product list.
- Design File (if needed)
- A design used to drive the contents of the shelf.
- Include all the information needed to organize and set levels for properties that might change from one respondent to another or one shelf exercise to another.
- This can be used in place of, or in conjunction with a planogram.
- Master product list that can easily be linked to the design
- Image file name to link the images supplied with the design file and/or planogram. The names should match. This is not required if Jibunu is handling the photography.
- If there are images of products with different sizes, it is helpful to associate each size with a variable. For example, if there are 5 different sizes, the labels 1-5 could be used with each of the numbers corresponding to a particular size (12 oz, 20 oz, etc.). This helps us resize the images relative to each other if needed.
- Prices and sale prices.
- Any data that is important to have in the data file such as product number, UPC code, etc.
- Any additional information needed to fulfill requests in the instructions, the design file and/or planogram should be included.
Images
- High resolution images are required. These should be at least as large as they will appear at their highest magnification. Generally, the largest images are at least 1200 px high or 1200 px wide and the rest of the images are sized relative to these.
- PNG is the preferred format as it allows for transparency and has less quality loss.
- Image size should be relative to all other images used on the shelf. While we can resize images independently, this takes longer, requires additional information and has additional costs associated.
- Image names should match what is recorded in the master product list, or we will need to be provided with a mapping file.
