The Respondent Manager is where to quickly search and access data on the respondents in your survey, as well as clear IDs for re-invite, or re-categorize those you would like to remove from your data for quality reasons.
The Respondent Manager is accessed from the main page of JUMP. Upon entering the Respondent Manager, you will see the blue menu on the left of the screen. Click the orange “View Respondents” button to generate the ID list to the right of the menu.
Multiple IDs can easily be entered/pasted, with the IDs being delimited by a space, comma, or line break.
The Basics
Once you click “View Respondents” all respondents (or those that match the selected filters) will populate in the white space to the right of the blue menu. The text “Showing ### of ###” will appear below the “View Respondents” button and is the number of IDs that have been populated.
If you have multiple pages of IDs, you can advance to the next page of IDs via the bar at top and bottom of the current web page.

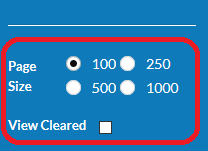
This section also gives you the ability to:
- Select all populated IDs and Select None
- Adjust Page size (number of IDs shown per page)
- View cleared Respondent IDs by selecting this box before clicking “View Respondents”

Under Basic Filters the default setting is to show live IDs. If you would like to review only test IDs, you can select the X next to 0 – Not Test ID.
![]()
Once populated, the Respondent Manager grid shows the following information:
- Select: You will need to select this box to apply various actions to specific respondents
- Descriptions and instructions for filtering respondents, exporting IDs, and clearing respondents or marking them as removed from data are available later in this article.
- XID (and view data): XID is the unique Jibunu ID generated for each respondent. Clicking “View Data” will open a new tab and show you all answer values for that respondent only. Only questions seen and answered by that specific respondent will appear on this page.
- Unique ID: This is the ID assigned to the respondent by you or your vendor.
- Sample Provider: This is the sample provider who captured that respondent and is useful for filtering if you are utilizing more than one vendor for the study.
- Language: This is the language in which the respondents completed the survey. This is useful for filtering if you are fielding in multiple languages.
- Terminate Location: This shows the respondents status in the survey. Complete is considered a terminate location. Please see below for examples of some of the terminate locations you will see:
- Complete
- Quota terminate locations by question
- Over quotas (OQs)
- OTQs
- Respondent Removed from Data
- In-progress
- Qualified but suspended for inactivity
- And more…! Please check-in with your PM if you have questions.
- Start time: This is the date and time that respondents first entered the survey.
How to Filter
Filters can be used to see specific IDs from your study, or to see IDs that meet specific criteria.
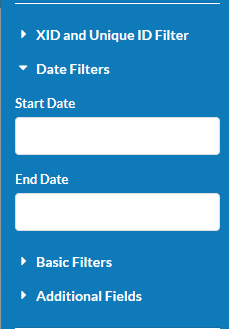
- XID and Unique ID Filter: Populates only the entered IDs.
- Date Filters: Respondents can be filtered by start date and end date, as well as start time and end time. When using this filter, only respondents who began the survey (start time) within the range of the filter will populate.
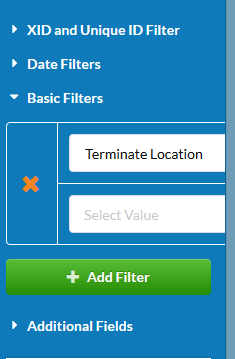
- Basic Filters: The following are examples you are likely to see. When a filter is selected, you will then need to select a value from within the selected filter category. This is a good way to see all of the available Terminate Location options in your study.
- Terminate location
- Sample provider
- Language
- Additional quotas in place on study (possible examples include Country, Age, or Gender)
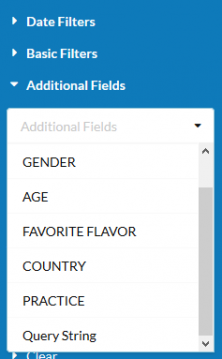
- Additional Fields: Information selected here will populate in an additional column when “View Respondents” is clicked. See below for some of the data that may be available. These fields will be highly dependent on the survey. Reach out to your PM if you have additional questions.
- Respondent answers for some quota related questions (possible examples include Country, Age, or Gender)
- Query string

Actions
This portion of the menu gives you the ability to update your respondent pool in real-time, 24/7.
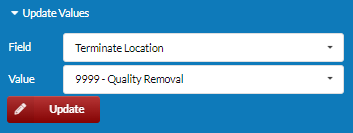
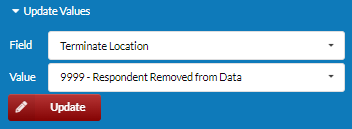
Update Respondent to “9999 – Quality Removal”
We recommend removing data quality respondents from your data by updating them to terminate location “9999 – Quality Removal” or on older surveys “9999 – Respondent Removed from Data.” Respondents flagged for data quality concerns, such as open-end quality, should be categorized using this action.
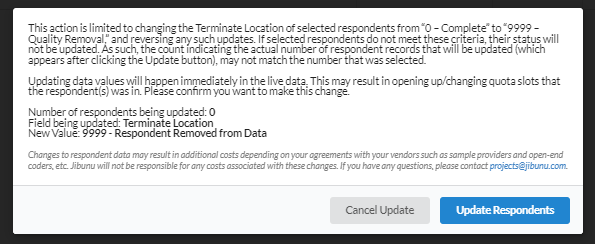
This will change a complete respondent to a terminate in your data, making them easily identifiable as removed from the complete data. The 9999 terminate is tracked in the Simple Counter, along with all other terminate locations. This makes for easy tracking of the # of data removal respondents you have had on a study, and the classification makes it easy to share with your sample vendor should they need the ID list at the end of fielding.
This action is only available after “View Respondents” is clicked and IDs have been populated.
- Select the respondent IDs you would like to update
- Click the white text “Update Values.” You will now see a drop down menu with only “Field” included.
- In the “Field” dropdown, select “Terminate Location.”
- In the newly appearing “Value” dropdown, select “9999 – Quality Removal” or “9999 – Respondent Removed from Data” (it is the second item in the dropdown), or you can type 9999 to search and select.
- Click the newly appearing red “Update” button.
- Review the confirmation screen and click blue “Update Respondents” button. Your respondents will not be cleared until the confirmation page is completed.
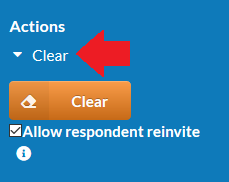
Clearing Respondents for Re-Invite
Use this tool to clear data for respondents you would like to re-invite. This will allow them to re-enter the survey using their original link and UniqueID, even if they have previously been over-quota or terminated. This is useful should you require additional respondents for a previously full quota group or make changes to your survey that would allow previously ineligible respondents to qualify.
This action is only available after “View Respondents” is clicked and IDs have been populated.
- Select the respondent IDs you would like to clear.
- Click the white text “Clear.” The orange “Clear” button will appear. The button remains grayed out if no respondents are selected.
- Click “Orange” clear button.
- Review the confirmation screen and click blue “Clear Respondents” button. Your respondents will not be cleared until the confirmation page is completed.
![]()
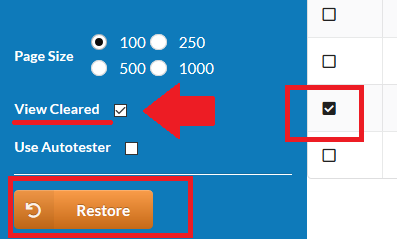
Restoring previously Cleared Respondents
Cleared data can be restored at any time and can be viewed by selecting the option “View Cleared” before clicking “View Respondents.”
This action is only available if “View Cleared” is selected when “View Respondents” is clicked and IDs have been populated.
- Select the respondent IDs you would like to restore.
- Click orange “Restore” button. The button remains grayed out if no respondents are selected.
- Review the confirmation screen and click blue “Restore Respondents” button. Your respondents will not be restored until the confirmation page is completed.

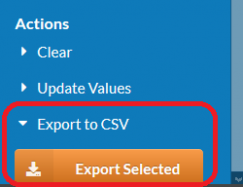
Exporting IDs
Populated IDs can be exported as a CSV file for easy review. This action is only available after “View Respondents” is clicked and IDs have been populated. Only the information visible in the table will be exported, not any respondent survey data.
- Select the respondent IDs you would like to export. If you would like to export all populated IDs, you do not need to select any.
- Click the white text “Export to CSV”. An orange button will appear. It will read “Export Selected” if you have IDs selected. If no IDs are selected, the orange button will read “Export All.” When you are ready to export, click this button
- Select “Open with” or “Save File” in the dialogue box pop-up, followed by “OK.” Your file will now download or open, based on your selection.